
Learning to take a screenshot on PC is one of the most basic, but also essential procedures that you should know. And although you probably have an idea of how to do them, then we present you step by step one of the simplest options to make that capture you need.
Whether you need technical assistance and someone to help you with an urgent problem, or simply want to take a screenshot on PC because you need to quickly save what you are seeing, you will need to know how to do it according to the type of computer you have. The truth is that there are several different options in Windows, and the method you choose to depend on your preferences.
Here, we will guide you through the easiest way to start, and then we will offer you an alternative method at the end.
You may also be interested
Step 1: capture the image

The area in which you want to capture the image must be visible on the screen. Press the button Print Screen or Imp Pan which is usually located at the top right of the keyboard. You can also press Alt + Print Screen to capture a piece of the active screen.
Note that you will not be notified that a photo was taken, but the image will be saved as a PNG file in the clipboard. If you are using Windows 8 or 10, simply press the Windows start key + Print Screen to get a full screenshot to be saved in the fileScreenshots In your images.
If you have Dropbox installed, the screenshot will also be automatically deposited in your Dropbox directory, in Screenshots. Microsoft OneDrive will do the same if you tell it to do it the first time you print screen after setting it up. You will find screenshots in your OneDrive folder at Images> Screenshots.
Step 2: open the Paint program

In Windows 10, you can open the Start menu, go to All applications and scroll through the alphabetical list until you find Paint.
In Windows 8, press the windows key to open the home screen. Then, click on the down arrow in the lower left corner, press "Ctrl" + "Tab" or swipe down from the center of the screen to access the Application View. From there, select Paint.
For Windows 7, click on the Start menu, go to the folder accessoriesand click on Paint. The icon shows a paint palette with a brush, but vary slightly depending on the operating system.
The three iterations of Windows also include Windows Search, which can be used to search for Paint.
Step 3: paste the capture

Once opened, click on the button Paste (or Paste in English), located at the top left. Choose the option Edit and then Paste, or pressCtrl + V on the keyboard to paste the capture. These instructions work the same for almost all operating systems.
Step 4: save the screenshot

Click on the main option "Archive" in the upper left corner, followed by "Save as".
Title the new file, choose a location to save and select the desired file format from the drop-down menu. For most purposes, JPG will do well, but there are a variety of other formats available to choose from, such as: PNG, BMP, GIF and others. Click on the gray button “save”In the lower right corner when you're done.
And so easy! And you should have your screenshot.
ALTERNATIVES
Use the Clippings tool (or Snipping Tool)
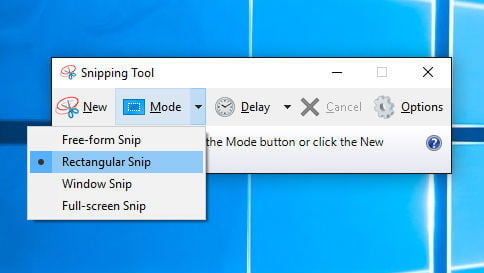
The best alternative method is the Windows 10 cropping tool. The screen capture utility built into Windows works quite well, but it is not the most robust or versatile when saving an image. However, the clipping tool is quite useful, as it allows users to better define and capture the part they want from their desktop screen as an image, without the need for a keyboard. It's not as fast as just pressing Print Screen, but it is much more precise.
Simply type it in the Windows 10 search bar to open it. From there, they will give you options like making a Free form capture", a "Windows Capture" or one "Rectangular capture". You can even set it to delay a certain amount of time if you are trying to capture a precise moment in a video or animation.
It is a tool that is constantly evolving, and with the Windows 10 October 2018 update it was associated with the image editing functions with the Crop and Annotate application. Now, every time you take a screenshot, it automatically appears as a thumbnail as MacOS Mojave does so you can then take it and edit it directly in the Crop and Annotate application.
* Article updated on August 23, 2019 by Mara Teresa Lopes.
Editor Recommendations
